There’s a lot to talk about in this picture but today’s post will be focused on how to decorate behind your couch in the living room / family room!
If you’ve looked for picture ledges before, you’ll quickly learn that you can only find affordable ones at IKEA. The problem then becomes limited options. You’ve got 2 colours, black or white, and 2 sizes, small or large. We wanted a rustic-style, wooden picture ledge and we needed it to be 90″ in length. The only place that came close to having something like this was Pottery Barn and of course, it was hundreds of dollars. (Don’t get me wrong, I LOVE Pottery Barn but it’s not the place for basics). So we said, let’s make this ourselves! For only $25 and 3 short hours, we built ourselves the exact picture ledge we wanted for our family room!
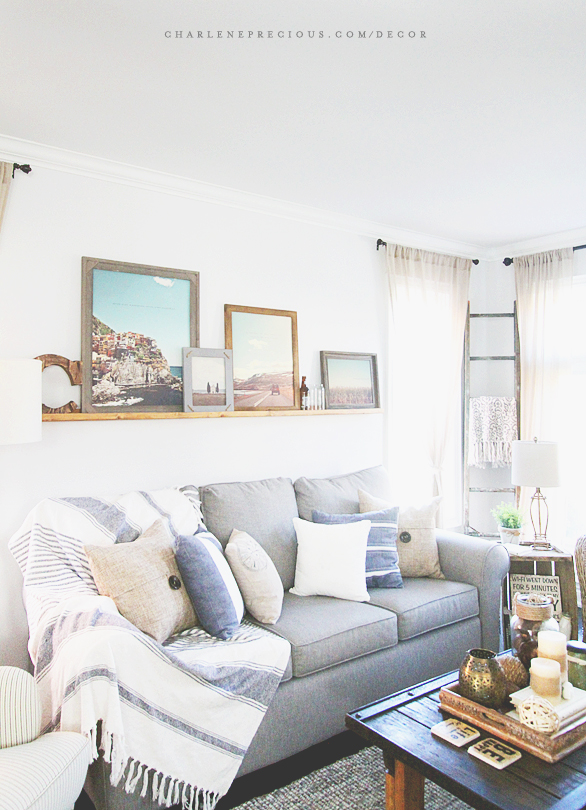
Picture ledges are an easy way to fill all that empty space above your living room / family room couch and is more substantial and interesting than just putting up wall art, which seems to be among the most common we’ve seen. You just need 3 pieces of lumber cut to the right sizes, wood stain, and nails. Here are some general dimensions to guide you:
Your base piece: 3″ depth, 1/2″ width
Your back piece that gets screwed into the wall: 1 1/2″ height, 1/2″ width
Your front “lip” or “ledge”: 1 1/4″ height, 1/2″ width
The length is entirely up to you and what your space needs. If it happens to be going above your couch, then we’d recommend the length of your couch.
Take these dimensions to Home Depot and they’ll cut the lumber for you right then and there. :) All you’ll need to do back at home is nail the 3 pieces of lumber together and stain it with Minwax Wood Finish. We used their Puritan Pine stain.
On our picture ledge are our very own Manarola Cinque Terre, Iceland Road Trip, La Vitaleta Chapel, and Corn Field prints. The rustic frames are from Homesense. Not all of them were actual picture frames; some came from bulletin boards and mirrors. It’s about spotting the right frame! It doesn’t matter what it’s framing in its original state. :) As long as you can pop the frame out and use it for pictures, you’re golden. And remember, ditch the glass. Glass-less frames work best with our matte-finish prints!

Lumber – Home Depot
Minwax Wood Finish: Puritan Pine – Home Depot
*Featured Art Print: Manarola Cinque Terre – Charlene Precious Co.*
*Featured Art Print: Iceland Road Trip – Charlene Precious Co.*
*Featured Art Print: La Vitaleta Chapel – Charlene Precious Co.*
*Featured Art Print: Corn Field – Charlene Precious Co.*
“C” Accent – Homesense
Rustic Frames – Homesense