Work can be so much more fun and inspiring if it’s in a beautiful room. Here’s my humble little workspace. It doesn’t take much to pretty up your office! In fact, in our case, this room was high priority in the sense that we wanted to put it together quickly (so I have a place to work) but it was also low priority from a budget standpoint. We had an entire house to furnish, so we held back on office budget. We reused and repurposed a lot of old stuff that we brought from the apartment and still managed to put together an inspiring work desk area. Here’s how!
First, pick a room with good bones and by that I mean WINDOWS! Lots of windows = lots of natural light = naturally beautiful. Then secondly, bring some vibrance with colour and patterns. If there’s one thing I’ve learned it’s that your office is truly the safest place to be bold and adventurous. It doesn’t really have to go with the rest of the house if you don’t want it to. It’s yours and it’s not shared with anyone else. :)
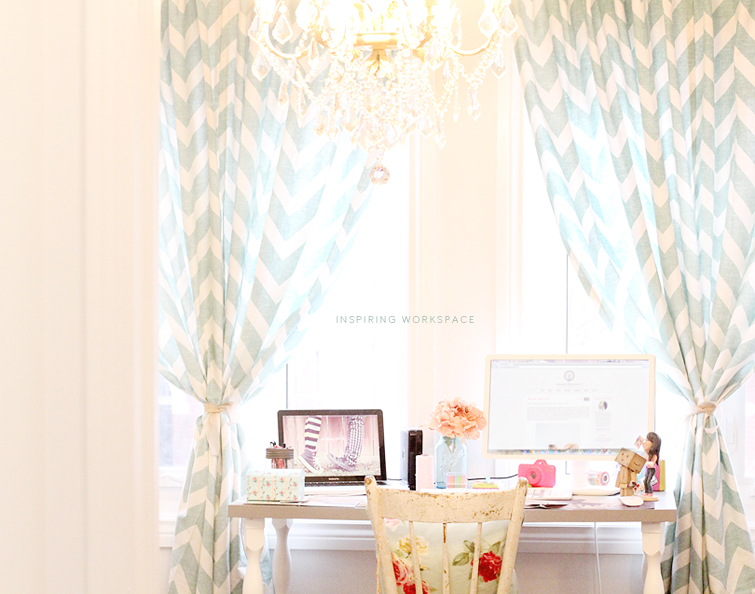
My main focus with this post is DRAPES because drapes are truly magical and change the entire room. If ever a room feels incomplete or not quite there, try drapes. We re-used these patterned ones that were carryovers from the apartment. I like my drapes a little long where they hang loosely on the floor. I also like to hang drapes high, just a few inches (around 3-4″) from the ceiling or from the edge of your crown moulding if you have them. This makes your windows look bigger and the ceilings higher. Don’t make the mistake of hanging them too low; we’ve seen drapes hung just a few inches above the window trim and you’ll quickly learn that you won’t get all its glory that way.
Then think about how you want your drapes to hang. There are a hundred different ways to do this but the most common (and easiest) ones are letting the panels hang straight down, tied to the side, or tied in the middle. In our case, we wanted to tie them right in the middle with burlap ribbon and then we used the drapes to frame up the work desk that now sits in between the tied panels. We made sure these drapes looked hearty, thick, and significant by joining two panels per window. So what you’re seeing in the image is a total of 4 panels, 2 per window tied together. Very important to note that sometimes, 1 panel per window works perfectly, particularly if you’re going for a lighter look with say, sheer linen drapes. Other times, 2 panels work better if the look is supposed to be heartier and heavier. It all depends on the look you’re going for and type of drapes you’re using. :)
The other focus is light fixtures. Light fixtures are also fabulous pieces to anchor a room with. We’ve anchored 3 rooms in this house with chandeliers because they are simply the prettiest things on Earth and add so much character. Not to mention they’re bright like the sun. For this office, we went with a glitzy crystal chandelier with an antique finish. Chandeliers can sometimes cost a fortune but this one was a cheap and cheerful one from Home Depot. It’s not always about buying expensive pieces, it’s about knowing how to put things together! For only $200, this gorgeous chandelier has added just the spark that this office needed.
DECOR TIP: Try exploring drapery and light fixtures when looking to anchor your room decor onto something that then guides the remaining decor pieces that follow.

KLIMPEN Table – IKEA
Hampton Bay Heritage Antique White Chandelier – Home Depot
Zigami Rod Pocket Back Tab Window Curtain Panel – Bed, Bath and Beyond
Antique White Chair – Christie Antique Show
Throw Pillow – Homesense